“When you cure your acne, then you will do makeup!” often heard by people with problem skin.
I don't agree with this. If you have healthy skin and an even complexion, foundation is not really needed, except for evening makeup or photo-video shooting.
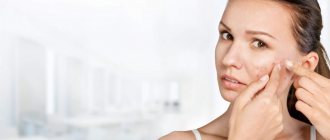
In everyday life, it is those with problem skin who need concealers more than others.
However, walking from morning to evening with a thick foundation on your face is also not the best idea; this approach can aggravate acne. Why? And I described in detail how to find the golden mean in the book “55 Mistakes in Facial Care.”
And in this article I have collected for you tips from makeup artist Elena Igradi from an interview for my channel “Cosmetologist.net”
- What can't be hidden with makeup?
- Makeup mistakes with acne
- How to disguise a subcutaneous pimple
- Pimple crust - what to do
- How to hide acne spots
- How to choose foundation for problem skin
Makeup mistakes with acne
There is no need to dry out the skin and acne. It is impossible to remove or disguise a dry crust; makeup will only emphasize it.
Do not squeeze pimples - blood-red crusts will only complicate the task of camouflage.
The relief can only be removed in Photoshop @emeraldxbeauty
Cosmetics for problem skin
What decorative cosmetics should I choose for problem skin?
If your skin is prone to acne, you should not use pink-colored products , they will only emphasize irritation and redness on the skin. Bronzing products will hide minor imperfections and add radiance to the skin.
Makeup for oily problem skin should be done with creams that are not too greasy. Products based on petroleum jelly and lanolin are contraindicated. They will clog pores and provoke new inflammation.
The best solution is liquid foundation , which contains a minimum of fat. They have a light texture, they lie on the skin in a thin layer, are able to level the surface, make it smooth and give the skin a matte finish.
How to disguise a subcutaneous pimple
1. A large subcutaneous pimple is usually a little purple, and in such a situation it is very important not to use the green concealer that they like to sell us just for such a case.
In fact, it works so-so with purple. In this case, a gray-yellow corrector is more suitable - it can tone down the redness and work with purple.
2. The amount of corrector should be vanishingly small. First you need to apply the corrector, and then the foundation. It is best to apply the foundation using patting movements so as not to smear the concealer layer.
3. Another important point is that during the day, the newly appeared subcutaneous pimple will grow and increase in volume. Therefore, subcutaneous camouflage should be approached like clothing for a child to grow into.
Do not use dry concealer - it will crack immediately. The camouflage of a subcutaneous pimple should be elastic.
Concealers such as NARS Soft Matte Complete Concealer and Make up for Ever Full Cover Concealer are suitable.
4. Don't rely too much on makeup fixers. Fixers are not makeup armor. They only allow makeup to last a little longer in ideal conditions.
That is, in essence, these are means for a spherical horse in a vacuum - they only work if you help them. You can apply a little powder to set your makeup. Just a little bit for grip.
Let's create an even and beautiful complexion!
First of all, we need to prepare the skin for makeup: with problem skin, this moment is the most important. We thoroughly cleanse the skin with a cleansing gel, go over the face with tonic, apply cream for the skin around the eyes, serum, and then cream. You can also do a light exfoliation before applying makeup.
Next, we apply the primer: choose not traditional mattifying primers, but those that create a blur effect - they will smooth out the pores, make the tone a little more even and make it easier to apply the foundation.
After applying the primer, we apply the foundation using a special sponge or duo-fiber brush. The secret is that you don’t need to use too thick a foundation to avoid the “layer cake” effect. The whole secret is to use a large amount of products, but in minimal quantities and the right texture. Apply the tone carefully, blending well with back and forth movements, paying special attention to imperfections, redness, as well as the wings of the nose and the under-eye area.
Next, we arm ourselves with the green corrector: point-by-point, very carefully, apply it to the rashes. Minimal amounts are enough to cover redness. And on top, with a flat concealer brush and nude corrector, we spot-conceal the “green”. Do not rub the corrector, apply it with tapping movements.
Now it’s the turn of a light concealer - we shade it under the eyes with a small duo-fibre.
The finishing powder in this type of makeup should not be too dense, but it should not be completely transparent either. It is better if it is a light finishing loose powder with minimal covering power and a “blur” effect, that is, smoothing out pores and imperfections.
So, the facial tone is ready. We lightly go over the cheekbones with a brush with a sculptor, indicating blush. It is very important not to apply a bright blush to problem skin - it can greatly emphasize the rash. Neutral pink blush is enough.
If you have problem skin, then you should not add highlighter. Highlighters and luminizers, although they create very beautiful effects on the face, this technique only works on very even skin, and the highlighter, unfortunately, mercilessly emphasizes all the imperfections.
We shape your eyebrows in the usual way, paint your eyes according to your mood and add a neutral lipstick, maybe a little berry. But it is better to put off bright red or dark plum shades for the period of skin treatment: red lipstick can “pull out” redness from the entire face, so all efforts at masking can go to waste. The ideal option is caramel glitter, such shades are very refreshing.
Voila - your makeup is ready. We are confident that all imperfections can be corrected and that even those with the most problematic skin can enjoy the delights of beautiful makeup.
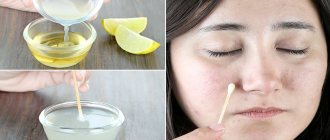
Pimple crust - what to do
Do not dry the crust before applying makeup. It is better to moisten the crust as much as possible so that it becomes soggy.
When you have soaked the crust, you can try to carefully remove it with a cotton swab. But here, as in the case of burrs, there is a limit that cannot be crossed. Otherwise, a wound will appear that will be impossible to disguise.
It is better to remove the remaining crust from makeup using a cotton swab dipped in micellar water. Remains of micellar water can be removed with another clean, damp end of the same stick.
A crust on the face will look more natural than something that looks like a croissant - a wound covered with tone, from which ichor appears