All girls strive for beauty. They are constantly in search of the perfect cosmetics that can highlight their strengths and hide their flaws. Blush is designed to give a fresher and more youthful appearance. Lipstick - to bring your lips closer to ideal. The toner is designed to leave your skin looking even and healthy. But proper facial contouring will help completely change its shape without surgical intervention. We will tell you more about it in this article. You will learn the history of the origin of this technique and the subtleties of its application.
Why do you need such a make-up?
Makeup “face contouring” can relieve many girls and women from their complexes. With its help you can:
- Reduce or increase the length of the nose, make it thinner or thicker.
- Get rid of the massiveness of the forehead, make it less “overweight” and “heavy”.
- Draw cheekbones, completely or partially remove chubby cheeks.
- Make a sharp chin less noticeable.
- Add sharpness to the features or, conversely, softness.
These are the most common options. In fact, sculpting can visually remove many imperfections.
The main stages of preparation for sculpting
- After choosing the right sculptors and highlighters, take care of a thoughtful place to do your makeup. Provide lighting, natural or artificial, that is as close as possible to the lighting of the place you are going to.
- Prepare not only contouring products, but also a makeup base. This will greatly simplify the application of cosmetics with any texture. For the best fixation of cream products, a special transparent powder will be useful.
- Take care of your facial contouring tools. Brushes of various sizes are ideal for applying and blending dry products. They are also suitable for applying cream sculptors and highlighters, and a sponge will do a better job of blending them.
- Cleanse your face, use your favorite day care product, apply foundation, if necessary, disguise wrinkles and other skin imperfections with a corrector - and you are ready to start sculpting.
What is needed for this
Facial contouring lessons will be effective only if you have special cosmetics. So, to start doing makeup, you will need:
The basis
This could be foundation or BB cream. Without this, it is impossible to start any make-up. It is important that the tone matches your skin color. Too yellow, too white or too dark a shade can ruin the whole composition. Choose the foundation that you are most comfortable using. It should match not only the color scheme, but also the type of dermis. Recommended foundations:
Palette
Since contouring is a play of light and shadow, you will need bronzers, highlighters and correctors. For convenience, they are collected in special sets. They can be dry or creamy. We will tell you how to choose them in the next paragraph.
Brushes
You can apply the product either with brushes or with a beauty blender. There should be several types of brushes in your arsenal. We will also talk about them below.
All necessary tools and makeup products can be purchased in the online store 1mmtt.su. The assortment of the First Moscow Customs Goods Store includes a wide variety of beauty products at attractive prices. Hurry up, go to the catalog, you are guaranteed to find something suitable for yourself.
Who can benefit from sculpture?
Contrary to popular belief, this technique is necessary not only for those who want to visually get rid of a few extra pounds. It is also important to take into account that modern foundations can be quite dense and completely hide the natural shades of the skin. This leads to the fact that the face covered with tone looks flat and unnatural, and to eliminate this shortcoming, light contouring is indispensable.
Even if you are absolutely confident in your own irresistibility, try to slightly emphasize the relief of your face using contouring. You may like the result so much that this technique will become another useful tool to help emphasize your strengths.
How to contour your face: choosing cosmetics
Palette
What to look for when choosing a sculpting kit:
- Naturalness. All shades in the palette should be close to natural. The presence of red, orange, black or blue pigments is not allowed, as they will not blend organically with the flesh color.
- Blush. They shouldn't be too bright. Choose what will look good on you. It can be peach or soft pink pigment.
- Structure. If you choose a creamy product, it should be very soft and smooth. Dry cosmetics should consist of very small particles. It is important that the contents of the palette fit perfectly on the skin and shade well.
- No glitter. Matte tones will allow you to achieve the most natural effect. Mother of pearl is only allowed as part of a highlighter.
- Corrector. The main shade with which you will darken individual areas should be no more than two shades darker than the skin.
We offer the following options for contouring kits:
Tools
You may need the following brushes:
- Big, flat and fluffy. It is good for applying and blending highlighter.
- Beveled. Best suited for drawing the cheekbone line. She creates a clear, smooth and at the same time natural line. This brush is convenient for blending cosmetics.
- Flat. Ideal for applying blush and contouring the nose.
- Kabuki. This is a voluminous brush that is convenient to use when applying creamy products.
Also, some girls note the convenience of beauty blenders. They are good if you have liquid or cream cosmetics in your palette. We offer you to purchase the tools necessary for contouring in our store:
Differences between dry contouring and cream contouring
Makeup artists distinguish two types of facial design:
- Dry;
- Cream.
Face sculpting - makeup
In the first case, only dry makeup products (hard powder, blush) are used. They allow you to hide minor facial imperfections, even out color, and add expressiveness. This method is suitable for beginners, as it is considered simpler compared to cream contouring.
The second option is suitable for girls who already have some experience in face painting. Creamy cosmetics are used for this. In this case, each area of the face is treated separately. It turns out to be a photoshop effect. At home, they use this method on their own, but it requires skill.
On a note. Applying dry contouring products daily can have a negative impact on your facial skin. Cosmetics dry out the skin and cause flaking. Therefore, the face needs additional hydration and nutrition.
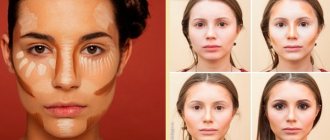
Face contouring scheme
Each form has its own subtleties and features of the correction technique. But there are certain rules that you need to know in order to understand contouring.
- Apply an even layer of foundation. The base should be a product that suits you perfectly in color and texture. This will make the tone more even and also increase the durability of your makeup.
- It all starts with the nose. To do this, you need to take a dark color corrector. Draw two lines along the entire length of the nose from the sides. You should also separately darken the area between the nostrils.
- The cheekbones are darkened from the ends of the lips along the cheekbone. If you can't see it, pull your cheeks in like a fish.
- Slightly darken the corners of the forehead, add a little color along the hairline. The end of the chin also needs to be “touched up” with a dark pigment.
- As a rule, the following parts need highlighting: the bridge of the nose, the “apples”, the area under the eyebrow and above the lip.
- Next, all lines are carefully shaded. Make sure everything looks as natural as possible.
What is concealer used for?
Concealer is a tool that can be used to hide imperfections on the skin of the face: unevenness, spots, bruises, pimples, damage and other flaws that spoil its appearance. The choice and correct use of this product is very important, because it helps a girl keep her skin in order.
The name of the concealer comes from the English word conceal - to hide. This is precisely the function of the tool. It is often confused with concealer: these cosmetics are indeed very similar and are often interchangeable.
But there are several subtle differences: the concealer has a lighter structure and is applied to large areas of the face, while the corrector is thicker and is used to disguise small spot defects.
Beauty brands themselves often do not differentiate between correctors and concealers: you can understand the nature of a product only by looking at how it looks on the skin. These cosmetics are produced in a variety of forms, including:
- Concealer stick. It is used to eliminate small defects when the greatest precision is important when applying the product, for example, when masking individual freckles, small pimples and spots, light moles. It can also be used to contour the eyes or lips instead of a regular pencil for lining. Many of these products have useful bactericidal properties, which help not only mask imperfections, but also combat them.
Concealer stick. Used for dry or normal skin; not suitable for those with oily skin, as it clogs pores. Used to conceal color imperfections on the face such as redness, freckles or scars and can be applied over very large areas of the skin but is difficult to blend out. It is not suitable for dealing with bumps or large blackheads and often only worsens their appearance.- Dry concealer, also known as powder concealer. Excellent for oily skin, as it neutralizes sebaceous shine and gives the face a matte appearance. Covers blemishes and pimples, but is not suitable for use around the eyes as it makes lines and wrinkles more visible.
- Liquid concealer is the lightest type in its structure, suitable for almost any skin except very dry skin. It perfectly masks wrinkles, is suitable for cosmetic treatment of the area around the eyes and practically does not clog pores, and can also be applied to almost the entire face like a foundation.
- Concealer cream. The most universal type of product. It has a dense structure, so it helps well in hiding dark spots, wrinkles and other noticeable defects. Often, concealer creams are produced not as single products, but in the form of sets with different colors - this includes, for example, the fairly well-known poppy palette (MAC Professional MakeUp).
Face contouring: step-by-step instructions and photos
Despite the general rules, each skull shape requires a special approach. Below we will describe the main features.
Round type
In this case, the game is played more with shadows than with light. You will need a bronzer that is one or two shades darker than your natural skin color. Pay attention to the cheekbone area. You need to darken the sides of your cheeks well to make your face look slimmer. This technique also makes the silhouette clearer and sharper. Add a little dark pigment along the outline to draw out the shape. Also don't forget to draw lines along the nose and add shadows to the chin.
Use highlighter to draw a straight line from the bridge of your nose to the tip of your nose. This will help shift the emphasis from the “heavy” bottom and cheeks to the center. It is also worth highlighting the triangle of the chin and the area under the eyes. Don't forget the blush: apply a little pink tint to your cheeks between a dark streak of bronzer and a light highlighter highlight. Carefully blend the entire composition, starting with light tones and ending with dark ones.
Oval type
The oval is considered ideal. This is what all makeup artists strive for. Essentially, the goal of sculpting is to achieve exactly this form. Therefore, it is enough for owners of an elongated skull to simply emphasize the main advantages of their appearance. You can make your nose a little shorter: to do this, draw a dark line only on half of the bridge of the nose. Do not overuse darkening of your cheekbones: this will only make your face appear longer. Draw a thin line from your earlobe to the dimple on your cheek. Also add some shadow to the corners of the forehead.
Place a little highlighter in the inner corner of your eye. This will open up the look and completely refresh the entire look. Outline the chin with a white line to balance out the entire outline. Add light pigment to the forehead area. There is no need to waste time on trifles here: “paint over” the entire area from the bridge of the nose to the middle of the forehead. Add some shine to the tip of your nose. From the wings to the beginning of the cheekbones, draw a line of blush.
Square type
The main goal of such sculpting is to make all the lines softer. That is why you need to start from the place under the cheekbone. Darken the sharp corners along the jawline. Smoothly draw a line of bronzer towards the temples and hairline to bring the square closer to the oval. Also draw dark stripes along your cheekbones. They must be very thin. You should never add shadows to your chin.
Use highlighter to highlight your forehead. Draw white lines from the corners of the eyes to the tip of the nose. Highlight the area under the lip with light and draw the stripe into the “triangles under the eye.” It is also worth adding a light pearlescent pigment to the chin. Fill the space between bronzer and highlighter with blush. Avoid horizontal lines: they will only emphasize the square shape. Make sure that each stroke is vertical.
Triangular type
Deeply darken your hairline. Draw dark strokes under the cheekbones to align the jawline with the rest of the face. Add a small black dot to the chin itself to visually make it a little smaller. Avoid accents on the nose and eyes: they are already quite noticeable. Highlight the area under the eyes, and then add pearl under the nose. Add light strokes to the forehead, under and above the eyebrow. Apply blush in clear and even strokes directly towards the wings of the nose.
Don’t try to bring the shape to a perfect oval: after all, this is much more difficult to do with a triangle than with a circle or square. Turn the features of your appearance into pleasant and memorable advantages. Just try to soften the lines as much as possible, make them smoother and clearer. There is no need to destroy all the specificity of the triangle. It will be enough to simply smooth out all the unevenness.
Features of highlighting
Often, when tone has already been applied to the face and light and shade has been created using contouring, it looks too matte, it lacks the colors of life and natural healthy volume. Lightly highlighting just a few areas on the face can instantly refresh the makeup, making it harmonious and natural.
If we talk about how fashionable it is, then the use of highlighter has been relevant for many seasons in a row. If you pay attention to fashion shows and photos of models, you will notice that sometimes makeup artists apply highlighter to the entire face. For everyday life, this option is too radical, and under no circumstances should it be used.
Face contouring for beginners step by step: photos and videos
In this video, a girl with a triangle shape shows the basics of contouring. Her face has many sharp angles: she tells how to soften them. Using specific products as examples, the blogger demonstrates the technique of applying makeup from scratch. She explains which cosmetics are best to choose and which brushes should be used.
Elena Krygina is one of the most popular beauty experts in the entire Internet space. Thousands of makeup artists and ordinary girls around the world listen to her advice. Because she competently and clearly explains all the intricacies of makeup. In this video, the girl tells how to do sculpting correctly. She shows, quote: “the average makeup of a star on the red carpet.” The video has already collected three million views, which means that it can be useful to you too!
Now you know how to properly contour your face. Don't be discouraged if something doesn't work out the first time. Makeup is a special type of painting. And in order to become a master, you need to make a lot of mistakes and get better at it.
Examples of makeup using palettes
Contouring has firmly entered the beauty industry. Some use light correction of their appearance, others enthusiastically create new images. How perfect your face looks after contouring can be judged by the photo.
Kim Kardashian is a contouring pro
Ideal image
Transformation of appearance
What color for what?
Using a facial concealer palette will be much easier if you first figure out how to apply a particular shade. The rules for color correction in makeup are based on the principle of the color wheel. Colors on opposite sides neutralize each other.
Main colors of concealers and their purpose:
- Green (mint). This color is used to mask red tint defects. With its help you can hide red spots, rashes, areas of irritated skin, red pimples.
- Violet (lilac, lavender). Cool shades with a blue undertone are used to correct yellowness. They mask age spots and healing yellowed hematomas. In addition, the purple hue helps to make a yellowish complexion look healthier.
- Yellow orange). These shades help combat blue. Vascular networks, dark circles under the eyes, bruises and purple spots, acne marks will all become less noticeable after using yellow concealer.
- Pink (peach). Pink concealer helps neutralize unhealthy greenish skin tone. It can be used to visually refresh your face.
- Flesh (nude). This shade is usually used for contouring. They can also mask swelling and minor imperfections, and can also be applied over color correctors to even out the tone.
Some sets contain white concealer. It is usually mixed with other shades to make them less saturated.